Using SQL Sever Management Studio – Part 2
In this tutorial you will learn further more about Using SQL Sever Management Studio, Registered Servers, To Register a server, Server Groups, The Summary Page, The Database Engine Administration, The tasks of a Database Administrator
Registered Servers
Registered servers can be viewed in the Registered servers window. Servers can be created and registered, renamed or removed in the SQL Server Management Studio. Information on frequently accessed servers will be stored in the Management Studio on Registration.
To Register a server
Right click a node in the Registered Server’s Tree and click Update Local Server Registration. This updates the local server registration.
If a new server has to be created and registered
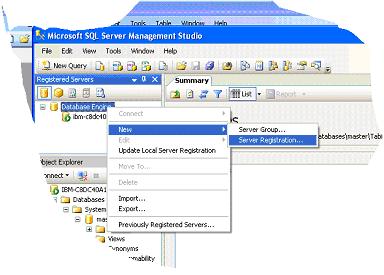
1. Click Database Engine in the Registered Servers tool bar
2. Right click Microsoft SQL Servers and point to New and then click Server Registration
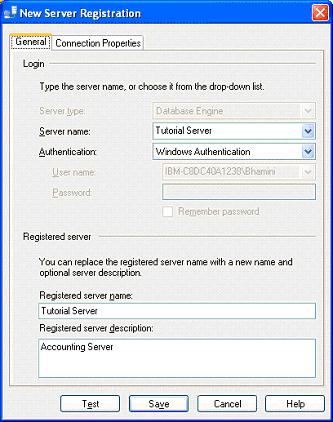
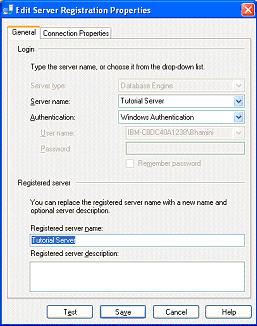
3. In the Registration Dialog box, click on General Tab and enter the name in the Server Name text box. If it is a named instance type the name in the format server_name[\instance_name]. In this illustration we have assumed that we want to create a server named Tutorial Server.
4. Under Authentication accept Windows authentication or select SQL Server Authentication and fill in the username and password.
5. Note that the Registered server name is automatically filled in. You can enter a brief description of the server in the text box provided for the purpose.
6. The connection properties information is optional at the time of registering the server.
7. To accept the default connection properties click on Save.
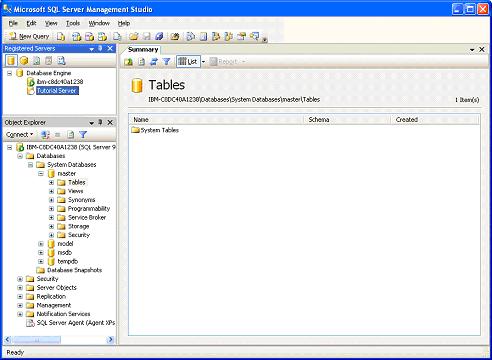
8. Note that the registered server appears in the registered servers list.
A registered server can be removed by right clicking the server and clicking delete. A delete confirmation box appears. Click Yes to delete the server.
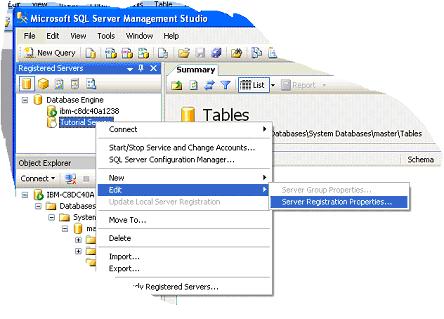
It must be noted that the name of the server can be changed at any time and a change of name does not impact on connection properties. The name can be changed by right clicking the server and pointing to Edit and then clicking Server Registration Properties.
Server Groups
As stated earlier, servers can be grouped together. Each group can be assigned a name. The name of the server group can also be changed by right clicking on the group name, pointing to edit and selecting Server Group properties. The name can be changed in the dialog box that opens.
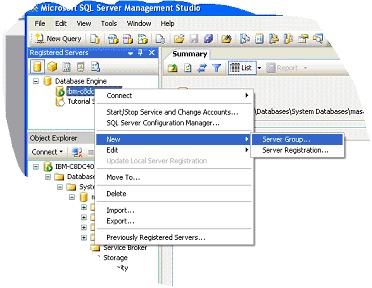
1. Server Groups can be created by right clicking the server type in the Registered servers toolbar.
2. Right click on a server or a server group and point to New and Click Server group as illustrated above.
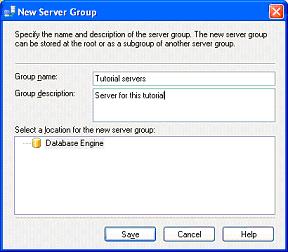
3. The New Server Group dialog box will appear. Enter the name of the group and a description. Select a location for the group. If no location is selected it is placed in the default location. Save.
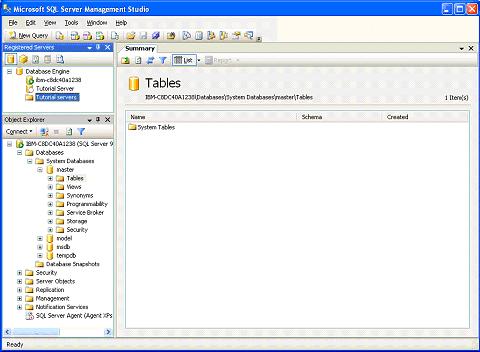
4. Note that a server group has appeared in the Registered servers window under Database Engine.
A registered server group can be moved to another location just as a server can be moved into another group. Right click on the server or server group and click Move To. The Move Server Registration dialog box opens. Expand the list of server groups and click the node in which you want your group to appear and click OK.
A server or a server group can be deleted by merely right clicking on the name of the server or group and clicking delete. The confirmation if given will result in the deletion of the server or the server group.
The Summary Page
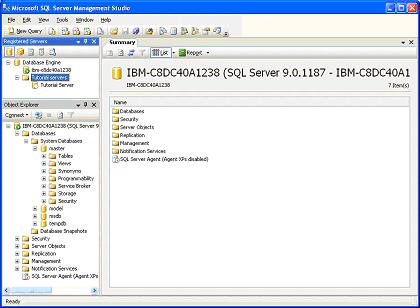
The summary page appears as the largest window on the Management studio interface. This window presents information about the item selected in the object window. The summary page can be configured to start as soon as SQL Server Management Studio starts or later. When the list mode is selected the summary page shows information about the higher nodes. When lower nodes are double clicked the information with reference to the clicked item is displayed. Clicking on F7 invokes the summary page.
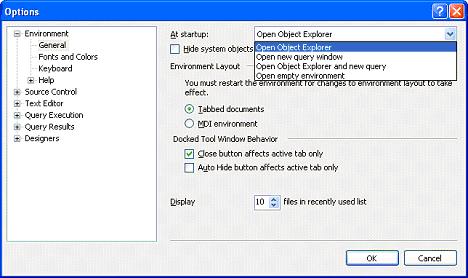
The summary page can be displayed at startup by clicking on the Tools menu and selecting Options. Under options select Environment/General and under At Startup select Open Object Explorer.
The purpose of hiding or displaying the Summary page and the different windows in SQL Sever Management Studio is to maximize user workspace for development and management. The aim is reduce the number of windows cluttering up the work area and to enable customization of user environment. Windows can be docked, undocked or Auto hidden(pushpin at the upper right of window), Windows are displayed on mouse-over and so on. Some of the components can be configured in tabbed mode in the same window or in a multiple document interface mode. All these features can be configured by accessing the window displayed above.
The Database Engine Administration
The Database Engine is the core service of SQL Server. It is the data store and the repository from which data is processed and in which data is secured. The Database Engine of SQL Server meets the most demanding data applications of an enterprise and provides support and sustains high availability.
The data store is in tabular or in XML format. The Database Administrator has a number of tasks to perform with reference to the database. The tasks are:
1. Creation of databases for storing relational tables or XML documents
2. Implementation of systems to access and change data stored in the database.
3. Deployment of the systems.
4. Administrative support for optimization of performance of the database.
The SQL Server 2005 data base engine comes with many self tuning database configuration options. However, Administrators will have to perform a number of configuration tasks to customize the server to match the needs of the enterprise.
Microsoft SQL Server 2005 runs as a service in the background in Windows 2000, Microsoft Windows Server 2003. The database engine, SQL Server Agent and other SQL Server components are services that are started when the operating system starts if specified during the setup process.
Starting the database engine in effect is the starting of a service. Users have to establish a connection to the server. This service named MSSQLSERVER, can be started and stopped locally or remotely.
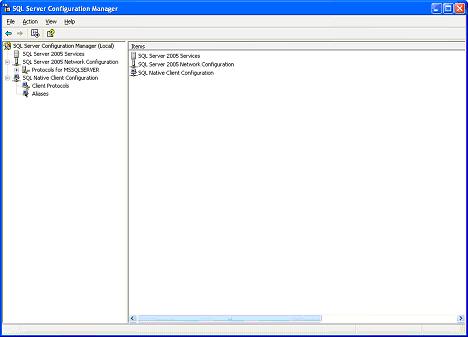
The SQL Configuration manager is a snap in tool in the Microsoft Management Console that combines the functionality of the Server Network Utility, Client Network Utility and the Service manager of SQL Server 2000. The SQL Server 2005 services can be started, stopped, paused using the configuration manager. The properties of the selected services can also be viewed using the configuration manager.
The configuration manager can be accessed by clicking on the Start menu > All Programs >Microsoft SQL Server 2005 > SQL Server Configuration Manager.
In this section of the tutorial we have examined the features of SQL Management Studio and how it helps in registering servers and managing objects that are available in the server. In the next section of this module we shall examine in greater detail each of the management of the database server.
[catlist id=178].


